Oct 21st 2020
Spooky crepes for Halloween - Crepe art DIY
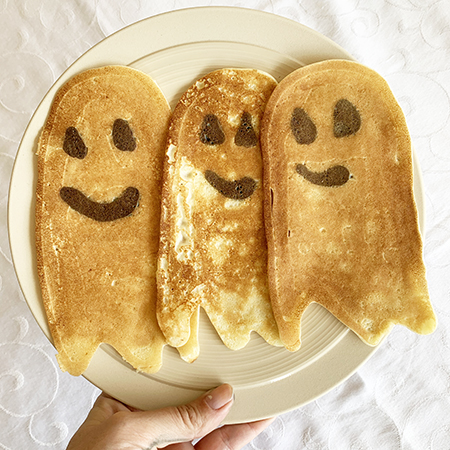
Spooky Halloween Crepes
Crepe art the whole family can make together. Squeeze bottles, food coloring, and a hot pan are all you need to turn a simple batter into pumpkins, spiders, and spooky faces.

Halloween and crepes are not two things most people put together. But once you try it, it makes total sense. The batter is thin enough to draw with, food coloring turns it any color you want, and a squeeze bottle gives you enough control to pipe designs right into a hot pan.
The trick is to draw the design first with the colored batter, let it set for a few seconds, then fill in the rest of the crepe. When you flip it, the design is locked into the surface on the side that cooked first. It looks impressive, it's actually not that hard, and kids absolutely love doing it.
Pumpkin faces, spider webs, spooky eyes — anything you can outline with a squeeze bottle works. You do not need to be an artist. Just have fun with it.
Ingredients
The crepe batter
|
For the crepe art
|
Which food coloring works best?
Not all food coloring behaves the same way in crepe batter. The type you use affects how vivid the color looks once the crepe is cooked.
Gel coloring ✓The best choice. Concentrated and vivid, a few drops go a long way and the color holds well when cooked. |
Liquid coloring ✓Works fine. You may need a few extra drops to get strong colors, especially for black. Easy to find in any grocery store. |
Natural coloringBeet powder for red, activated charcoal for black. Colors are softer and less vivid but totally food-safe and a good option for younger kids. |
How to make spooky Halloween crepes
Part 1 — Make the batter
Melt the butter with the milk. Put the butter and milk together in a small pan over low heat. Stir until the butter is melted and the mixture is warm but not boiling. Set aside.
Combine and whisk. Pour the flour into a large mixing bowl. Add the eggs and whisk together. Gradually pour in the warm milk and butter mixture, whisking as you go, until the batter is completely smooth with no lumps.
Part 2 — Set up the colors
Divide the batter. Split the batter between 3 containers. Leave one plain, add orange food coloring to the second, and black to the third. A few drops at a time — stir and check the color before adding more. Pour each into a squeeze bottle.
Shake to mix. Cap each squeeze bottle and give it a good shake to make sure the coloring is fully mixed through the batter. Check the tip opening — you want a thin, steady stream when you squeeze.
Part 3 — Draw and cook
Heat the pan. Lightly oil a crepe pan and heat over medium-high until hot. This step matters — if the pan is not hot enough when you start drawing, the lines will blur together before you can fill them in.
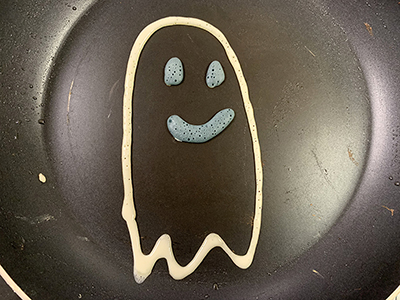
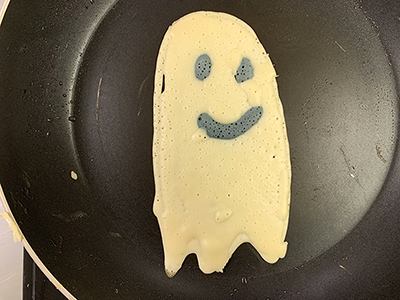
Draw your design. Using the squeeze bottle with your outline color, draw the shape directly onto the hot pan — a pumpkin face, a spider web, a ghost. Work quickly. Let those lines set for about 10 seconds before moving on.
Fill in the crepe. Squeeze the orange batter (or plain batter) over the rest of the pan to fill in around and between the design. Tilt the pan gently to spread it thin and even, the same way you would a regular crepe.
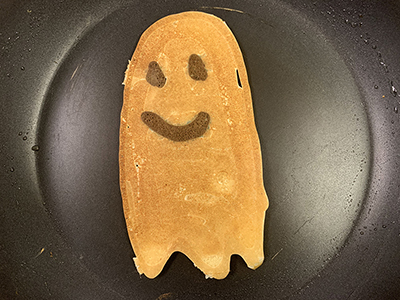
Flip and finish. Cook for about 2 minutes until the edges look dry. Loosen with a spatula, flip carefully, and cook the other side for 1 more minute. Slide out of the pan design-side up.
 |
 |
 |
 |
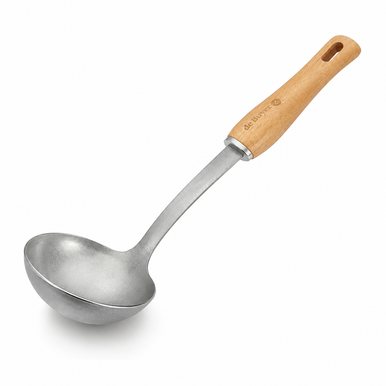
What I cook this with
These are the three De Buyer pieces I reach for every time I make crepes. All handcrafted in France.


Easy spooky designs to try
You do not need a steady hand or any artistic experience. Simple shapes work best because the batter spreads slightly as it hits the pan. Thick outlines and bold shapes come out cleaner than fine details.
Good designs to start with: a pumpkin face (two triangles for eyes, a jagged mouth), a spider web (a spiral with straight lines crossing it), a ghost (a rounded blob with two dark eye circles), or just spooky eyes staring up from the plate. Once you get comfortable with the pan, you can try anything.
Easy variations
Add more colorsPurple and green are great Halloween additions. Set up a fourth or fifth squeeze bottle and let kids mix their own colors. The messier it gets, the more fun it is. |
Make them sweetAdd 2 tablespoons of sugar and a teaspoon of vanilla extract to the batter for a dessert version. Fill them with Nutella, whipped cream, or sliced strawberries once cooked. |
Try other holidaysThe same squeeze-bottle technique works year round. Red and green for Christmas trees, hearts for Valentine's Day, or flowers for spring. Same batter, different colors, different occasion. |
Make it a party activitySet up a crepe station with pre-colored batter in labeled squeeze bottles and let guests design their own. Works great for kids' parties and makes a memorable Halloween treat. |
What I cook this with
These are the three De Buyer pieces I reach for every time I make crepes. All handcrafted in France.
Halloween crepe art FAQ
Why is my design blurring when I add the second color?
The pan probably was not hot enough, or you moved on too fast. The outline lines need about 10 seconds to set before you add more batter around them. If the pan is too cool, everything runs together before it can set. Turn up the heat slightly and wait a little longer between steps.
Is food coloring safe for kids?
Standard liquid and gel food colorings sold at grocery stores are food-safe and approved for use in cooking. If you prefer to avoid artificial dyes, beet powder gives a red-pink color and activated charcoal gives a dark gray-black. Both are natural and work fine in the batter.
Can I make the batter ahead of time?
Yes. Make the plain batter the night before and store it covered in the fridge. Add the food coloring and divide it into squeeze bottles on the day you plan to cook. That way the setup is quick and you can get straight to the fun part.
Do the colors stay bright after cooking?
Orange stays very vivid. Black tends to come out dark gray rather than true black — that is normal and still looks great on the plate. If you want deeper colors, use gel food coloring and add more than you think you need before cooking, since the heat does mellow them slightly.
What should I fill the crepes with?
For a Halloween dessert, Nutella, whipped cream, or sliced banana all work well. You can also serve them plain and let everyone pile on their own toppings. The crepes are sweet enough on their own if you add sugar to the batter, or neutral if you keep it plain.